
My simple 16 step system for adding comments to my static site built with Astro
Okay, maybe there aren’t sixteen steps, but it does feel slightly convoluted.
First, some background: my original solution for adding comments to this site was to use talkyard.io. I was grateful to have a 3rd party option that was low-weight, respected users’ privacy, and affordable. It worked great for the most part, but readers occasionally reported availability issues. I decided it was time to build something for comments myself.
At first, I thought about options for dynamically writing from and reading to a database. I looked into supabase as an option for storing comment data. If I wanted to render dynamic data from a DB on page load, I’d have to switch my note pages from statically generated to SSR (via server functions). I didn’t want to do that. I love how cheap and efficient SSG is.
Since I wanted to keep the notes pages static, I considered implementing the comments in an iframe storing a page using SSR. Kind of like how Talkyard worked, but from my own website. I also decided against that because I didn’t want to deal with sizing the iframe just right, depending on how much content was there1.
I reconsidered everything again… who says comments have to be dynamic, and stored in a database? The notes are just .md files in the site repo. What if the comments were just JSON files in the repo, too? I liked the simplicity of that idea.
I wanted the comments to live in my repo as JSON. How would I get them there? I tried a Netlify form for submitting comments, and it worked well. I was impressed with how easy it was to get a form functional on the site using this method. I got a few spam submissions at first, but after adding a honeypot field they stopped.
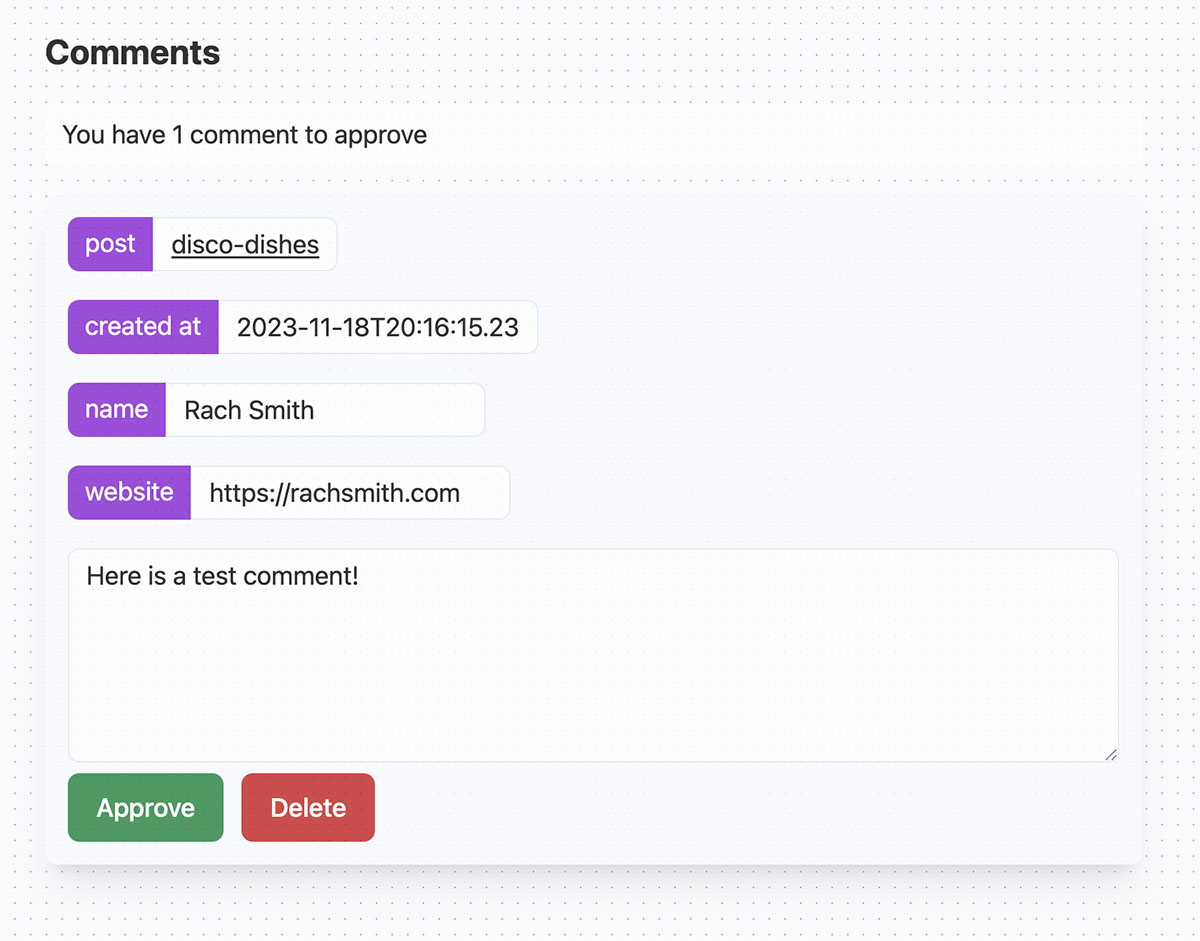
Netlify makes all form responses available via their API. I made a tiny SvelteKit app to read the responses from the API so I can review, approve or delete them. When I approve the comment, the app calls a tiny Express Server that writes the comment data to the JSON file in this website’s data folder. Then, I review and commit the changes with git, like when adding a new note.
This is what I mean when I say it is pretty convoluted. To approve a comment, I have to:
- be on my computer
- running the SvelteKit app locally
- running the Express server locally
- commit the changes with git
But, considering how infrequently I get comments submitted to this website, it is working just fine for now. What I love most is how fast the comments load for users on the site. The comments are just HTML: no scripts, no iFrames.
In the future, I may make the system a little more portable: deploy the SvelteKit app to hosting somewhere and learn the GitHub API so I can commit changes from the cloud. Then, I could approve and publish comments on the go. Right now, I have no desire to do all that2.
I have the SvelteKit app and node server code in a GitHub repo if you’re interested in seeing the code.
Comments
Arco
November 20, 2023 at 3:59 AM
Very nice! Also a cool way to ensure that comments are archived/transferable to future website setups!
Stefan
November 20, 2023 at 4:53 AM
That's a creative approach! I'm wondering about bringing comments on my blog for ages and am hesitant about a 3rd party.
I might look into this low-key approach. Thanks Rach!
Darek Kay
November 22, 2023 at 7:07 PM
I love static site generators, but including comments is indeed not as straightforward. I've been collecting all the tools and techniques for some time now. Ironically, I've decided to turn off the comments on my own blog 😅
Cassidy
December 10, 2023 at 6:13 AM
I am very pro-"keep blogs as simple SSGs" so I'm all for this. And it makes me want to noodle on other ways to implement it without requiring some of the steps you have. Hmmmmmmm.
turpelurpeluren
January 24, 2024 at 9:19 AM
Yeah! That is a smart approach! Nice to not need third party comments or host your own server. I feel like it would be nice to not have to commit the repo manually for every comment tho, but it sounds like it could be possible with the Api..:)
Mia
February 2, 2024 at 6:44 PM
Awesome tip for getting comments working with a static site. Also wanted to say that your blog design is fantastic!!! I love the colours and I haven't seen a mouse train in ages
Chad
February 7, 2024 at 2:44 PM
Thank you! Inspired by this article, I just implemented my own AI-moderated Astro comment system.
An SSR script adds saves comments temporarily to a Vercel DB (and displays the comment to the person posting immediately).
Then, periodically, a cron grabs the new DB posts sends them to OpenAI for moderation and then merges the ai-approved comments into Github (using an Astro data-collection for comment JSON files). Merging into Github triggers a rebuild/redeploy on Vercel.
Fully static Astro site with comments and AI comment moderation.
Kevin Spencer
February 9, 2024 at 10:26 PM
This is great.
I love stumbling across a new blog and being able to leave a comment. The reasons a lot of bloggers don't want the hassle of it I completely understand. But it's a great way to foster a conversation around a post without hunting for an "email me" link.
Rizqi Fahma
May 1, 2024 at 8:25 AM
Glad to hear that there's this article about adding comment on Astro blog as it is not that easy to find.
Mahmoud
May 20, 2024 at 11:35 AM
That Cool
Rafael
June 30, 2024 at 11:40 PM
Great! Thanks for sharing!
mike
August 7, 2024 at 10:30 PM
Interesting Approach to Comment Management
This is a really interesting solution! I appreciate how you found a way to maintain the efficiency and simplicity of static site generation while incorporating a comment system. The use of Netlify forms and a custom approval app is a clever approach.
Some Thoughts
Future Enhancements
I would like to see a similar way to do it without relying on Netlify
Thanks for sharing your process! Looking forward to seeing how this evolves.
Cold
August 29, 2024 at 11:03 AM
Great Article
kik
September 4, 2024 at 4:08 PM
h3ll0
Jan åke
September 11, 2024 at 7:59 AM
Great!
evie
September 29, 2024 at 8:18 AM
that's sick! i used this as a basis for building my own comments stuff, although it uses an actual database. but it still came with some useful ideas!
Dillah
October 12, 2024 at 5:41 AM
Awesome
Blake T.
October 24, 2024 at 4:03 AM
Cool
Inshrah Usman
November 20, 2024 at 11:32 AM
This is such a creative approach! I love how you balanced simplicity with functionality—inspiring for low-overhead web projects.
alex
December 9, 2024 at 6:44 PM
cool idea
Milan Milutinovic
January 10, 2025 at 5:16 PM
Great Comment Rachel! I will try implement this sytem in my own blog
Jonathan
April 2, 2025 at 11:58 PM
This is awesome
Piotr
May 8, 2025 at 10:42 PM
Interesting approach—keeping it static with JSON files in the repo is simple and avoids the usual database overhead. Using Netlify forms and a review app to manage submissions makes sense. Not flashy, but definitely functional.
Randika
May 14, 2025 at 2:12 AM
Thanks for this
Aaron
May 15, 2025 at 1:49 PM
Awesome, your blog is great
Dwain
May 21, 2025 at 3:19 PM
Thanks for sharing Rach. I love your site, it's beautiful, well done.
Oleg
June 2, 2025 at 5:17 PM
Great idea! Make HTML powerful again!
Miso
June 12, 2025 at 1:42 AM
Amazing. Might try it myself!
John
June 28, 2025 at 11:10 PM
Thank you!
Odhy
August 7, 2025 at 2:40 AM
This is really cool!
Trzm
August 13, 2025 at 3:23 AM
Genius
Mhx
September 10, 2025 at 5:10 AM
will try it out. Thank you.
Dharmeshkumar
October 2, 2025 at 5:12 AM
I was struggling with adding a comment system in my static site, and this guide really helped. Thanks for simplifying the process 🙌
Leave a Comment
💯 Thanks for submitting your comment! It will appear here after it has been approved.